A Poor Man's Cast-Iron Welding Furnace
by Tom Carnegie-July 2005
Often in the course of events it becomes necessary to repair a cast-iron part.
There are various ways to go about this. Amongst the methods I've encountered are
brazing, epoxy, arc welding, metal spray, pinning and gas welding. I will give a
brief description of each method mentioned along with some pros and cons.
Brazing: Cast-iron brazes fairly easily. It is suitable for repairing broken ears
or small parts. If the weld required is too large or in the center, pre-heating of
the part is required. Pros: Easily done, strong, brass (bronze) has similar wear,
strength and expansion properties to cast-iron. Cons: May require pre-heat. Poor
color match.
Epoxy: Simple cracks can sometimes be repaired by veeing out the crack and filling
with a two-part epoxy, such as JB weld. Pros: Easily done. Can be done cold
(won't damage babbitt, or anything else due to heat). Cons: Not terribly strong.
Effected (loses strength) by heat. Poor color match. Expands at different rate
from cast-iron due to heat.
Arc Welding: Generally the edges of the area to be welded are beveled or vee'd out.
The casting is then welded a little at a time with nickel rod. If too much is
welded at once, the casting can crack. Peening the weld as it cools can help
prevent cracks. Pros: Generally easy to do. Strong. Fair color match. Can sometimes
be done without preheat. Cons: Patience is required to achieve decent results.
Generally cannot be machined as the area where the cast-iron joins the nickel
becomes very, very hard. Sometimes requires pre-heat. Fair color match.
Metal Spray: The part to be repaired is preheated. Powdered metal is melted with
a special torch and sprayed onto the part to be repaired. Pros: Fairly strong.
Fairly good color match. Cons: Requires pre-heat. Requires specialized equipment.
Pinning: Holes are drilled and tapped into the area to be repaired. Cast-iron
plugs are then screwed into the holes, generally with some sort of thread locking
compound applied. Pros: Easy and inexpensive. Fairly good color match.
Cons: Adds no real strength to the repaired area. Not suitable to hold two
separate parts together. Not suitable for thin sections.
Gas Welding: This is done with an oxyacetylene torch. The area to be repaired
is vee'd, then filler material is melted into the trough. The part must be
pre-heated. Pros: Excellent color match. Easily machined. Nearly as strong as
the original part. Cons: Difficult to do. Requires specialized equipment. Requires
pre-heat. It is this last method that I will deal with in this article.
Equipment and Materials:
Furnace: A furnace can be made with fire bricks. Fire bricks generally are 4-1/2"
by 2-1/2" by 9 inches. You can calculate how many bricks are needed by the size of
the part to be welded. The furnace that I made to weld a Model T head required
twenty-nine bricks.
Charcoal briquettes: This is our heat source.
Oxy-acetylene torch.
Cast-iron welding rod. This rod is available from many welding supply houses.
It is nearly pure cast-iron.
Flux: Special flux for welding cast-iron, also from your welding supply place.
Jig: Needed to hold the part to be welded off of the coal bed.
Gloves: Good heat resistant ones.
Tinted face shield: To keep your nose from getting burned.
The Procedure:
The first thing to do is to prepare the part to be welded. Clean the area where
the part is to be welded. I use a sandblaster, but a sander would probably work
as well. Determine where the ends of the cracks are, if that is the kind of repair
that you are making. "Stop-drill" the ends of the cracks. Vee the crack out all of
the way to the holes. I use a carbide bur on a high-speed grinder. If the part is
to be butt-welded, taper both parts to be butted.
The next step is to build your furnace. Stack the bricks on a good, hard, steady, fireproof surface. The process can make a lot of odor, so you may want to do it outside. Be careful of combustibles, because you are playing with fire. Make your furnace cavity as small as you can and still comfortably fit the part to be welded into it. I usually tie a rope around the bricks to help stabilize them.
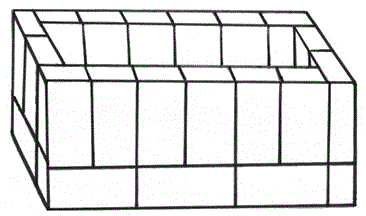
Into the bottom of the furnace place something to support the part to be welded. It should raise the part a couple of inches to give room for a good bed of coals. Fill the furnace to the top of the jig with charcoal.

Ignite the charcoal and let it burn until you have a good bed of coals. Place the part to be welded into the furnace. You may add more charcoal if needed. Allow the part to heat for a few hours. If you place a piece of paper onto the head and it quickly chars, the part should be hot enough.
Now comes the tricky part. Welding cast-iron is a different sort of thing from
other types of welding. If you want to practice to get a feel for it, you can try
to weld two pieces of brass together with brazing rod. Heat the filler rod and dip
it into the flux. Just a light coating is all that is needed. Simultaneously heat
the part and the rod and work the rod into the vee as the metal becomes molten.
One of the problems that you will encounter is that the base metal melts at nearly
the same temperature as the filler rod. This can cause the whole system to
"collapse" if you are not careful. The other main problem that you will probably
encounter is gas bubbles. I use a strong light to see these bubbles and continue
to "work" the area until they are gone. You can also come back and put another
layer of weld on top of problem areas. As you work you'll likely find that your
hands get very hot. I try to hold the torch and rod beyond the edge of the furnace
as much as possible.
Also, as mentioned earlier, you can burn your face if you don't wear a full mask.
When you have completed the weld, immediately fill the furnace full to the top
with kitty litter. This will put out the coals and start the cooling process.
Let the part cool overnight. If the part cracks, not enough pre-heat was used.
If the part has hard spots, it has cooled too quickly. If the procedure is done
correctly you will have a weld that is virtually indistinguishable from the base
metal and is eminently machineable.